Sunday 22 December 2013

Guttering and drainage

Not much has happened over the past few weeks but I have now worked out drainage and ordered guttering. Rather than use the typical black plastic I decided to purchase some galvanized steel guttering. I ordered this on Friday from the Green Rain Water store. I should receive the goods just after Christmas. 

In the mean time I have made a temporary door to prevent rain getting into the shed. With strong winds and very heavy rain (and more forecast) it made sense to try to keep the shed dry.

Hopefully work should recommence fairly soon on fitting guttering. Before I can begin to dig the drains I will need to landscape the garden around the shed.
View from lean to end showing the temporary "door".

Thursday 3 October 2013

Fitting the glass

With all the oak feather-edge cladding finished the next task was to fit the glass. This was a task that I was a little anxious about. The planned method of fixing was to have the glass on the surface of the oak frame with softwood spaces (to the thickness of the glass plus seals) to which air dried oak cover frames would be screwed to hold the glass in place.

I purchased four pieces of 6.4 mm thick single laminated glass; two pieces 2095 x 945 mm and two pieces 2025 x 1219 mm. I ordered these from Smokeson Glass - a local supplier; they were delivered in four days. (I soon realised I could manage to lift the smaller sheets on my own but needed help with the 2025 x 1219 sheets)
Detail showing glass in position and bedded on 
to cedar strips and seal. The 20 x 50mm 
softwood packing frame is clearly visible.
The cedar strips can be seen in this image


Although I had used a hand plane to remove any significant bumps I was concerned about the irregularity of the oak wall posts and therefore decided to bed the glass on to a frame of cedar strips (which I planed to 9mm thick x 30mm wide) and lightly fixed with brass pins. I thought this would help to reduce the irregularities in the frame. 
I used EPDM Dry Glazing Tape from Reddiseals to bed the glass on to the cedar strips and also for the seal between the external face of the glass and the oak cover frame. The thickness of the glass and the seal (on both faces of the glass) and the 9mm thick cedar frames meant I could use standard 20 x 50mm planed softwood for the packing. I screwed the softwood to the oak posts with stainless steel 4.5 x 60mm Turbo Ultra wood-screws (from Screwfix) and also used these screws to fix the oak frames to hold the glass in place. I drilled a largish pilot hole to ensure I was able to remove the screws if I need to make any adjustments. As far as I can tell at this stage everything looks OK.
Bottom and side retaining frames in 
position

This detail shows the bottom oak
retaining frame screwed into position.


The glass panels in place

View from east end with gable ends completed
View from west end 

With the glass now in place most of the remaining tasks are finishing off bits and pieces. I also need to make two oak glazed doors and one window (which I hope to make some stained glass for). Following a suggestion from a friend I will probably lay a stone floor. As work progresses I will continue to update this blog.


Tuesday 13 August 2013

Cladding the walls

With the tongue and groove timber for the end walls painted it has now been possible to fix the internal wall and finish cladding the external walls with feather edge oak (with the exception of one gable end). The same principle of a tongue and groove internal wall - 50 mm x 50 mm  battens (to fix insulation) fixed within a 50 mm x 75 mm frame (to fix breathable membrane and oak external wall) was used.

Internal wall with 50 mm x 75 mm battens fixed (lean to end)

Insulation fitted and membrane part fitted to opposite end

Internal wall (with lounge and groove fitted to eaves)

Internal wall (with lounge and groove fitted to eaves)

Oak feather edge fitted to rear of shed

Oak feather edge fitted to end wall (eaves to be completed)

Tuesday 30 July 2013

The rear wall

The tongue and groove timber for the rear wall was painted over 4 days - and fitting was fairly easy. 75mm x 50mm battens were screwed to the frame with stainless steel screws and 25mm x 25mm battens fixed inside each frame - insulation was stapled to the 25mm square battens and breather membrane secured on to the 75mm x 50mm battens. (See previous post Gable end and extension – 7 July 2013)


Internal rear wall of the shed and extension
It will be necessary to infill between the rafters and ceiling with short lengths of tongue and groove prior to fitting the oak feather edge.

I did not fit an internal wall to the end of the extension only covering the oak frame with breather membrane. I did fit an internal wall to the rear of the extension to maintain a line with the rear of the shed but this was not insulated.

With the membrane over the end of the extension the oak feather edge could be fixed.

Oak feather edge fitted to the end of the extension
Detail of front end 


I have now begun to paint the tongue and groove timber for the end walls and think about ordering the large glass panels for the front and end corners. The glass will be fitted to the face of the frame using softwood packing and air dried oak strips - EDM sealing tape has been ordered from Reddiseals

Sunday 14 July 2013

Finishing the extension roof

The oak fascia was attached in the same was as on the shed. Once this was completed the membrane, Permavent Easytray, battens and the lead flashing could all be fitted. The height of the extension meant that the join of the roof to the shed wall overlapped the gable end. As a result of this there was a "step" in the roof/shed connection that required some cutting and shaping of the lead. The scaffolding was moved to allow access and slates were fitted to the roof.


Fascia, membrane and battens fitted

The extension roof nearly completed
 With the roof completed it was now possible to finish the gable end by fixing the oak feather edge. The boards were quite heavy so it was necessary to temporarily bang a nail in at the correct height one end to support the board whilst the other end was nailed.


The Gable end and extension roof finished
With the boards fitted the slates could be attached to the gable end. The next job is to paint and prepare the boards for the walls.

Sunday 7 July 2013

Gable end and extension

After fitting the 25mm x 25mm battens the insulation could be fixed. This was a straightforward job using offcuts from the roof. This was then covered with breather membrane (as used on the main roof).

25mm x 25mm counter battens for insulation

Insulation fitted to counter battens


I made and fitted a treated softwood frame to fit in the top of the extension - this was a simple way of providing a secure foundation to attach the weatherboarding. The next job is to complete the roof on the extension.
Softwood frame fitted to extension

Thursday 4 July 2013

The extension

Having received the post supports for the extension and wanting to start the extension roof prior to fitting slates on the gable ends I decided to tackle this next. This was not a major task. Two purlins needed to be cut to length and halving joints cut to locate the purlins on the frame. The holes in the tenons needed to be marked and then the frame dismantled and holes drilled - pegs needed to be made. The extension frame could then be reassembled and the post supports concreted into the ground.


Post Supports

Post support in position ready for concrete
Once the frame was pegged it was necessary to start to clad the gable end of the shed and cut rafters for the extension. I decided to use the same colour paint for the gable ends as I did for the ceiling and just had enough tongue and groove already painted to finish the one end. 
Cladding on the first gable end (the orange cord is attached to the cut off bottom of a plastic bucket that sits on the stove flashing to keep out the rain).
Once the tongue and groove was in place I cut and fitted 50 x 75 mm  treated softwood battens to take the oak weatherboarding. 

I had decided to use 100mm x 50mm treated softwood for the rafters on the extension.

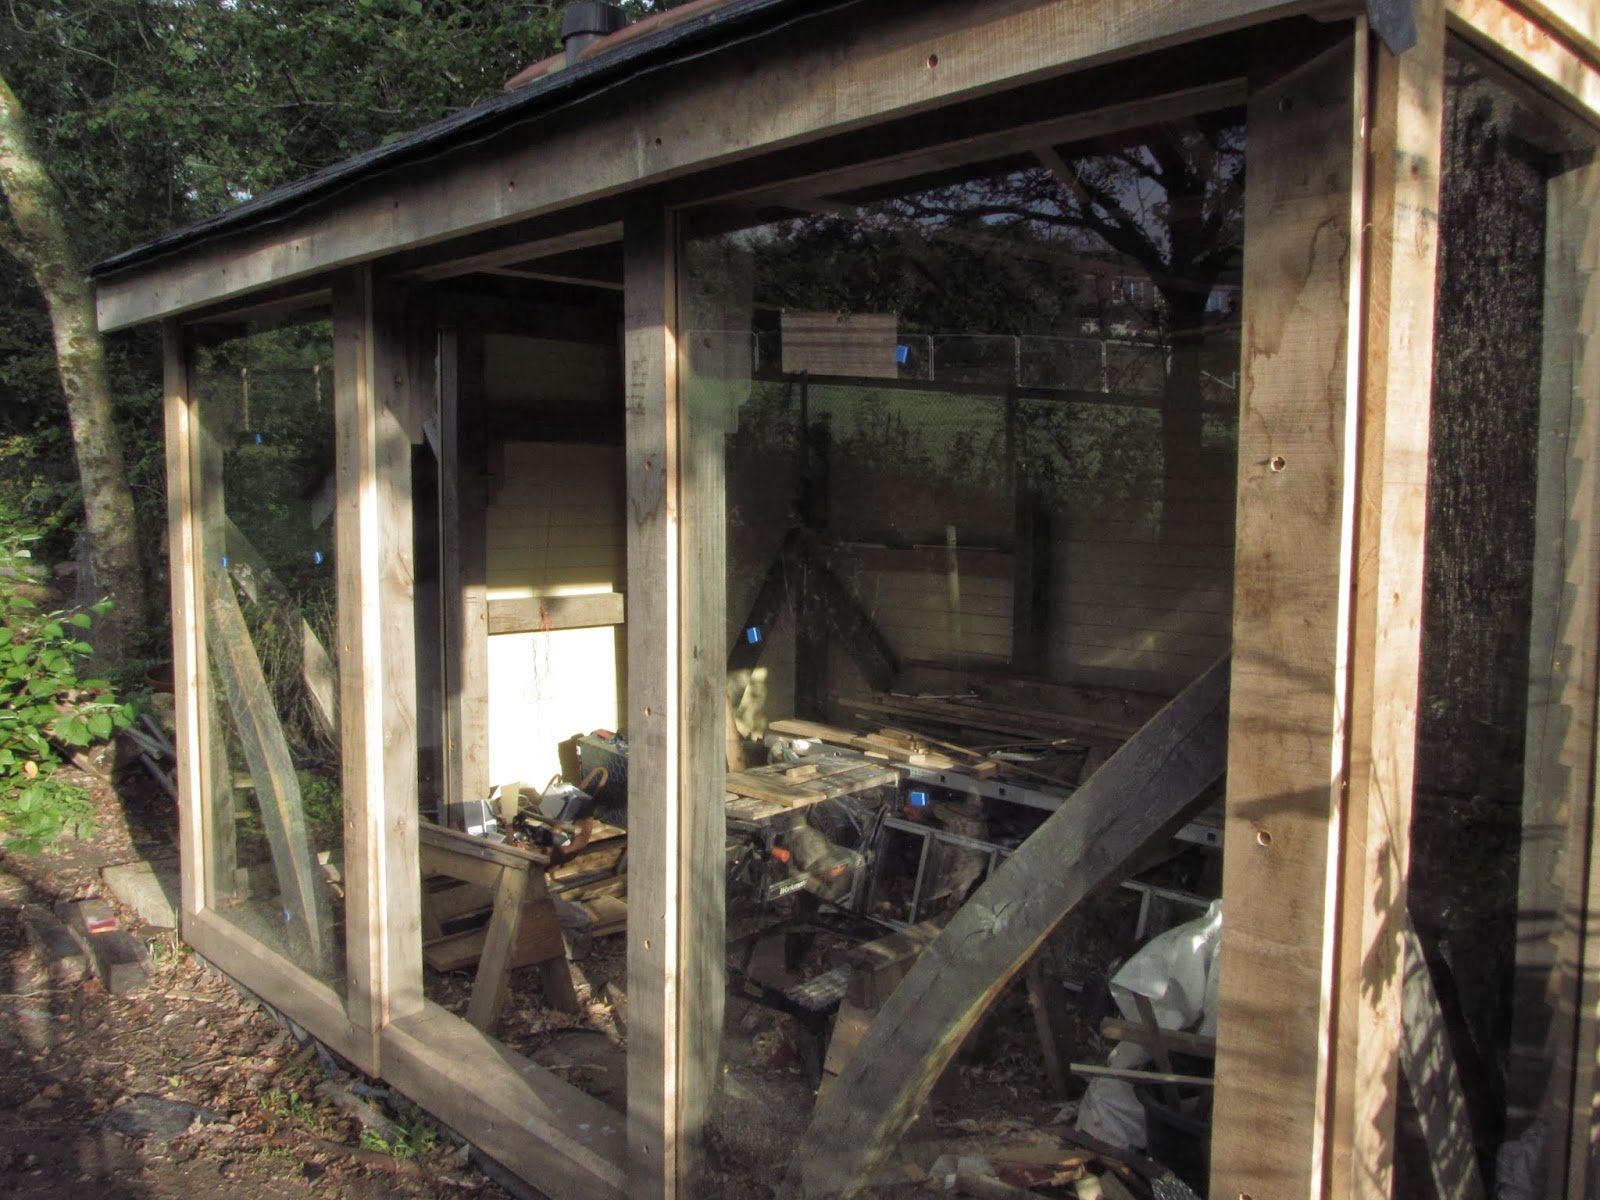
The gable end with 50 x 75mm battens fitted and 100 x 50mm treated softwood rafters positioned but not fixed on the extension roof
The next job is to fit 25mm x 25mm battens inside the frame to fix the insulation to. I will use wastage from the shed rafters cut into 25mm widths for this. The frame will be covered with breather membrane prior to cladding with weatherboarding.

Finishing the roof

With some good weather allowing progress to be made the roof is now finished with ridge tiles in place and stove flue fitted. 
Detail of the lead flue flashing - partially fitted.

Finished roof

Thursday 13 June 2013

Starting to finish the roof

Before I update on progress of the roof I just wanted to mention the excellent service I received from Dean Forge. I waited six months for the posts (see post on 26.11.12.) I ordered from the original company and then gave up. I went to Dean Forge and they quoted the same price and I had them within five days! 

The roof
After much deliberation I decided to purchase some 12 mm thick tongue and groove softwood to form the ceiling. I purchased this from Southern Timber. I was unsure what the quality would be like but after applying knotting solution and four coats of paint the result was fine. I chose a dark red for the ceiling which I thought would suit the oak and also give a cosy feel to the interior. I painted the timber in strips of five pieces (which were 4.4 metres long). This took quite a while as I needed a total of 10 panels but the weather was poor so it was not a problem.

I waited for a forecast of dry weather for about a week (and this happened at the beginning of June) with the hope that the roof would be waterproof in this time. 

Getting the painted timber to the shed was not easy and eventually I took it through the house as this was the most direct route -  manoeuvring 4.4 metre long timber was not easy but I am pleased to say there where no breakages.

Getting the panels on to the roof was fairly straightforward and I nailed down with 65mm long galvanised nails.

A panel lifted on to the roof - painted side up to avoid damage

View of ceiling partially completed
Once the ceiling was fixed the next task was to fit counter battens to provide some air space for the insulation. I used double foil airtec insulation  (from Screwfix) as this is thin and should be sufficient for what I need. I zig zagged the insulation under and over the counter battens to provide some airspace - a compromise to avoid the roof becoming too thick.

The insulation fixed on the roof

View showing airspace
When the insulation was fixed I fitted Permavent breather membrane and fixed with battens.

Fitting membrane and battens
Once the battens were fitted the next task was to fit the fascia along the front and rear sides. I had purchased 150 x 25 mm air dried oak from Anton Coaker but this was not deep enough so I (reluctantly) set about cutting a tongue and groove to join the timber using a hand Lie Nielson Tongue and Groove plane. This was hard work as I had 8 metres of timber to join. Fitting on my own was not easy but clamping timber at the height required using  sash clamps did the job. I screwed the fascia to the rafters and will peg the holes over the screws.
End view showing the tongue and groove joint and support 

The front fascia fitted
Once both fascias were fitted work could begin to slate the roof. I plan to fit a wood burning stove so I contacted Dean Forge who advised me on the installation and arranged for a lead flashing to be made to go on the ridge of the roof and this was made in two days, meaning that slates could be cut as required without holding up work on the roof.

View from the west end with the slating partially completed. The stove will be fitted at this end and a temporary cover over the hole for the flue pipe can be seen 


Tuesday 23 April 2013

Completion of the main frame

Just about 18 months since I laid the foundations for the shed the main frame is now complete. Making the most of a glorious spring day today I fitted the last two pegs holding the rafter to the wall post at the eaves. I tapped all of the pegs a bit further in and cut the pegs protruding on the outside of the building flush ready to begin cladding the roof and walls. I trimmed the pegs on the internal faces to about 12 mm. There is still some work to do on the little extension but I am still waiting for the post supports before I can conclude this part of the frame.


The last peg (just visible on the left of the image)

Looking up at the roof frame

Looking up at the roof frame

Looking west towards the shed

Sunday 14 April 2013

Fitting rafters

A number of factors significantly reduced the work I could do on the shed between the end of December and end of March - not least the weather. However the rafters are now cut and in place on the roof. I still need to cut the rear rafters to length and finishing pegging along the eaves but this should be completed fairly soon (assuming the weather is dry).

I have purchased oak feather-edge boards (from Yandles) to clad the back and sides and will be collecting slates on Wednesday (from Independent Slate Supplies). I need to order plywood, waterproof membrane, insulation and battens and work can progress on cladding the frame.

Oak feather-edged boards
The first rafters fitted


Rafters fitted and cut to length